Hello and welcome to Textiles at Reigate College.
My name is Clairiscia Callanan and I’m the course leader for Textiles A Level. I’m looking forward to welcoming you to the Art & Design Department in person at the beginning of the academic year, but in the meantime I’d like you to complete a series of tasks and activities in preparation for the course.
These tasks have all been designed for you to complete independently from home over the coming weeks and months. When we start the course in September, there’ll be the chance to share your work with other Textiles students and discuss what you’ve learnt.
The tasks are organised in three distinct steps and should all be completed by Choices Day on 27 August 2025. This is to give you the best insight into what the courses will be like and/or help prepare you for them.
Please note, some Course Leaders (for example for Music) may release their tasks earlier, as they may form part of the College’s audition process. If this applies to you, you’ll be notified separately.
New Starters Course Tasks and Activities
| Release date | Suggested Completion Dates | |
| Explore your Subject | 1 June | 1 July |
| Get Going | 1 June | 1 August |
| Aim High | 1 June | 1 September |
The start of your A Level Textiles course may seem like a long way away but it’s really important to keep practising the skills you’ve developed through studying for your GCSE. One of the most essential skills in Textiles is being able to convey meaning visually; being able to represent your ideas in a visual way.
Understanding the Formal Elements in Textile is crucial to being an effective textile artist or designer. The Formal Elements form the basis of the language of art, and we use them to communicate to the viewer. The elements are line, colour, form, shape, value, texture and space.
Task 1: Research the Formal Elements in Art and Design to gain an understanding of what they are – write down a simple definition for each element: line, colour, form, shape, value, texture and space.
Task 2: Observe the world around you and using your phone take photographs that emphasise the formal elements. Recording the world around you, is an important aspect of the course and you need to be creative in your approach to photography! Try going close up, try using different angles and edit your photographs afterwards to effectively communicate each Formal Element. For this task you will need to have 7 or 8 final photographs.

Task 3: Using your photographs as a reference, create A5 studies of each element- try to over emphasise the element you are communicating through that study. For example, if you are studying your ‘value’ photograph, ensure you have a good range of tone from dark to light and good contrast in your study. 2 or 3 of the studies should be tonal drawing, however you can be creative with the others and explore media and technology that you enjoy using. This could be collage, painting, mixed media, watercolour, pastels or digital artwork. For this task you will need to have 7 or 8 final A5 studies.

Here are some Golden Rules of Drawing for Textiles
- Don’t smudge your tone; allow the marks you make to be directional and visible to help convey form and texture.
- Don’t draw lots of small objects spaced out and floating all over the page. Look at what is surrounding your subject and remember to include this to anchor your drawing. Look at your work from a distance to check you have sufficient contrast.
- Drawing can be recording evidence quickly in the form of accurate sketching or it can be long visual investigation; make sure you have a variety of styles.
- Plot the image lightly before you add detail, tone and texture. Be aware of the light source and record the darkest shadows first, looking for the true blacks and working back through the tonal range.
- You could also try drawing just in tone or dots or with a rubber on a tonal background.
- Consider the material most appropriate to capture the characteristics of your drawing.
- If the subject is moving, several overlapping sketches may be the best option.
- Check your drawing by looking at negative space.
- Try varying the type of mark you make to create texture and tone. For example, hard shiny surfaces are rendered with more solid marks and sharp contrast between tones. An orange’s pitted surface may be represented with dots; soft textures may have less defined marks. Tone can be created by placing the marks closer together and using darker medium such as softer pencil. Directional marks can also help show form e.g., curved hatching can help show a curved form.
- The lines and shapes in an image can convey different messages. Regimented, repeated lines suggest order and random lines chaos. Straight lines and shapes are more aggressive than curved. Repeated lines and forms can create a sense of movement. Lines and shapes can be used to create direction, which can help show form e.g., curved hatching on a tube shape. Direction can also create mood – top to bottom being more negative than upward.
- Importance can be given to elements of the image depending on the scale of them in relation to other elements or their location in fore, middle or background.
- The way elements of a picture are composed can create different moods and atmospheres. A very busy composition may look hectic and energetic. Imagine a landscape where a lot of sky is visible compared to one with a high horizon line. Perspective can create a sense of space and emptiness, or full intense images without a visible horizon. Different viewpoints can affect the way a subject is perceived.

Task 1: Using your photographs and drawings as a reference, create A5 textile responses of each element. Experiment with textile techniques to further explore visual imagery and generate outcomes. Create a series of small but high-quality textile responses for 5 of your drawings, selecting the most appropriate material and technique.
Consider the following:
- Weight of line
- Surface colour
- Backgrounds
- Textural Qualities such as smooth, uneven, rough etc
- Form and tone
- Application and stitch
Try working on multiple pieces at once. Below are some examples of experiments you could investigate when creating base materials for your textile responses. Experimentation and investigation are such an important part of the creative process for all practitioners. It would be helpful to take photos of what you do and record your thoughts and findings as you go.
- Basic Colour Dyeing
Dyeing fabrics using natural ingredients found in your home
Dyeing is a great way to change and give new life to old, unwanted fabrics. Natural dyes may work better on some fabrics than others, but experiment and see what happens. The dyes can be made from natural items found in your home like spices and vegetables.
Click here for guidance on how to dye at home.

- Experimental Dyeing
Once you have mastered basic colour dyeing, you could explore alternative methods such as tie-dye or dip-dye. This could add further interest to your items and create beautiful patterns and shapes.
For ideas on different tie-dyeing techniques visit:
https://i.pinimg.com/originals/ac/c6/0e/acc60ebaffb693d435681f77be91a2ea.jpg

- Marbling
This is a great way to add colour instantly to fabrics. You can create a variety of patterns, shapes and colours with the dye. Again, this method may work better on some fabrics than others and will probably be more effective with lighter materials and those that are more absorbent.

Instructions
You will need:
- Shaving foam (not cream)
- Liquid watercolor paint, food colouring
- Stir stick
- Scraper, such as a square piece of cardboard
- Shallow baking dish
- Fabric
- Cover the bottom of your baking dish with a layer of shaving foam.
- Drop colours into the foam and drag your stir stick through to create alternative shapes and patterns.
- Gently press your fabric into the foam.
- Lift out and scrape off the shaving foam with your scraper.
- You should now see your pattern.

- Potato Printing
You may want to consider printing onto your fabric to create repeat patterns or singular images.
Printing can be done at home using a simple potato and paints.

- Experimental Printing
Once you have developed basic skills in printing, explore other objects you find around your house to print with. For example the end of a toilet roll can be used to make a repeat circle print or can be squashed, folded, or cut, to create other shapes. Old sponges can be cut into shapes for stamps, or simply used as they are for textured prints.

Making a Zine
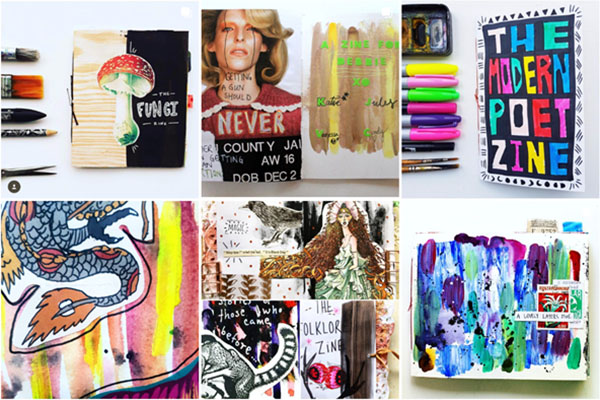
Hopefully you’ve enjoyed the making and researching tasks you’ve been doing in preparation for the A Level Textile course. The last activity is to put together some of your ideas/work you have done in a zine.
Look at this Instagram account called ZINE SQUAD:


Making a zine is really simple, just follow the instructions below.
STEP 1: First of all, you need to choose a topic to research for the theme of the zine. Topics could include:
- nature
- lockdown
- portrait
- things I notice that no one else does…
- the built environment
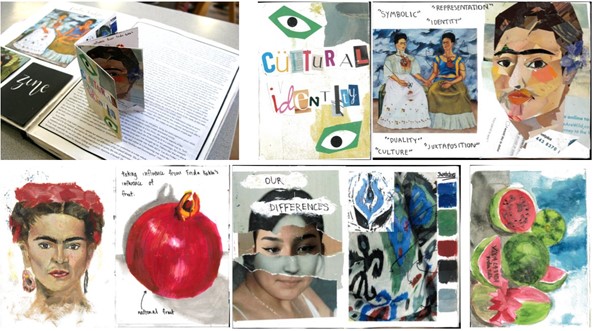
- culture and identity
- anything you are interested in!
OR… you could put your FORMAL ELEMENTS photos and studies from Task 1 into a ZINE!!!
OR… you could make an Artist Research ZINE using your research from Task 2!!!
The theme needs to run throughout the zine.
STEP 2: If you decide you want to make an eight-page mini zine, all you need to start is one sheet of paper. If you have A3 or A2 paper then that would be great, otherwise you can just use A4, or maybe stick two sheets together.
Following the diagram below, fold the paper into eight rectangles and cut a horizontal slit down the centre of the page between the four innermost rectangles. Each little rectangle on one side of the paper will be one page.

There is a video showing how to fold this style of zine on YouTube: https://www.youtube.com/watch?v=ZjjylE3SPj8

If you want to make a stapled zine, you will need to use several sheets of paper folded in half (so that the left and right sides touch) to make a booklet. You can stitch or staple the centre.
STEP 3: Fill the pages of the zine with drawing, material explorations, photographs, information, paintings etc. all linked to your theme. It should have a sense of investigation. To get ideas, you could:
- visit some virtual galleries to find artworks that link to your theme.
- copy sections of artworks to master techniques.
- make notes about the ideas and concepts behind the artists.
- try some of the drawing ideas from the earlier tasks and maybe add texture to some of the pages by working on more unusual materials like old fabric, newspaper with a coat of emulsion paint, torn paper etc.


Have fun creating your zine, and I look forwarding to seeing what you’ve produced when we start the course. Please bring in all the work you have done in preparation!
Thank you so much for taking part in the Textiles tasks, I look forward to meeting you all and reviewing all your amazing work.
Clairiscia

Course Leader – Fashion & Textiles


